Man, I had so much fun painting this portrait! I just love painting odd-looking character, where I literally don't have to care how pretty or handsome they are. So this guy works in the monkey laboratory, as an assistant to another scientist (who I haven't gotten around to painting yet). 

He's a little strange, but that's OK! :)


A quick post today, featuring a few fixes I made to things I already showed in the blog previously!

Starting with the famous "Granny's house", as you might remember I mentioned that I totally forgot adding cracks and whatnot to the roof. Here's what it looks like before and adding them: 


I also remade the interior windows a while back, and hadn't gotten around to adding them to her house yet! In this case, both a past and present state were needed:


Next, some vines growing on the house next to the inn, on the left part of the map: 


I might add more - perhaps the entire top side should be covered? What do you think?

Finally, to avoid any misunderstandings about being able to go back into the left house of the first zone, I threw in some rocks blocking your path to the entry:


See you next time! :)
And now it's time to transform the past version of the Inn to its present, abandoned state! My goal here is to make everything look old, as always, but also to make room for a fight (as there will be some fighting taking place here in the future)

The Inn in the Past
First up, I dull the colors of the walls and floor. I also remove the bar, so there will be more space for fighting. The wall decorations have mostly been lost to time, but you can still see where they've been:


Next up, I move the bar stools around, break a few of them, and start working on the tables and carpets. Since there will be a fight here, I make sure you can now walk on top of the tables by removing their legs:


Finally, the shelf and some details. The shelf has become mostly empty, with some spiders nesting where the liquor used to be. Some bottles remain, scattered throughout the inn. There's also moss growing on the wooden walls:


And finally, a GIF of the progress:


Time for another interior! This one is the Inn, one of the buildings on the left side of Tai Ming's second zone. This is the past version, which will feature a bar, some tables and a bunch of guests drinking or eating here in their spare time:


Looks a little empty without the NPCs huh? In another update I'll be adding some more decorations as well - as I uploaded this video I thought it'd be cool to add a flower decoration to the right of the door. The door leads downstairs to a storage area, by the way! It'll be important in your upcoming quests... :)

Sometimes you learn a new way of doing something that makes your life so much easier, and you really wish you knew about it earlier. For me, this is the case with Photoshop all the time (there are so many ways of doing the same thing!!), but even more so lately.

It began with me looking for an easier way of adding more than one image into the same PSD-file. Earlier, when adding multiple artworks to the same image, opened each file in Photoshop and copy-pasted them all, one by one, into the same document. I just figured there had to be an easier way of doing that - and boy, was I right.

Surprised by how much easier it could be, I was encouraged to look for similar solutions to other annoying things in Photoshop. In the end, I had managed to reduce the time it took for me to create a progress GIF by probably 90%, I'm not even kidding.

SO, in case anyone else is interested in this, and happen to not know about these things, here's how I do it now:

Preparing the Steps

In order to make a GIF of the steps, I first need to actually make the image and save snapshots of my progress. Now, I have heard that later versions of Photoshop might have add-ons for this, but I still use CS5 and since I'm really attached to it I don't see myself upgrading anytime soon.

So, instead of having some fancy program saving snapshots for me, I've saved each step manually as a PNG or JPG. And yes, that includes the entire Save-As process, where you have to manually set the file format and name the file every single time.

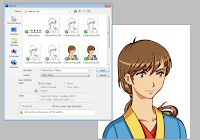
Well, after some searching, I found a script written by a guy at this forum, which basically allows you to save a JPG automatically when running the script. So, I saved his script to my CS5 scripts folder and assigned a shortcut for it:

Changing a few lines can turn it into a Save-as-PNG scrips as well!

So now, whenever I press ctrl+ä och ctrl+ö (cause I'm a Swede.. ;)) I'll get a snapshot of whatever I'm working on in the same folder as the Photoshop file. I just gotta remember to press the shortcut every once in a while, when I feel it's time to add another frame to a future progress GIF!

Adding the Steps to a Single Document

Now that the steps, or rather, the images that will become frames in our GIF are ready, it's time to load them all into a document. At the same time. Not opening every file one by one and then copy-pasting each of them for like 15 minutes, please!

Okay. So this is built into Photoshop CS5 and I'm sure everyone already knew about it except me. If you look at that list of scripts above, a few scripts above the Save As JPG/PNG scripts is one called "Load Files into Stack". Activate it, select your files and - you guessed it. They all get added to the same file, in order of name.


So with just a few clicks I can now add aaaall the frames I need instead of going through them all manually for hours and hours in total. Can you imagine how stupid I felt when I realized this? Man. If only I had known...!

Making the Animation

Now, Photoshop isn't the best thing out there when you're making regular animations, I'm pretty sure most people agree on that. Making progress GIF animations is something it can do really easily though, especially when you know where to look.

So, you've loaded all your steps into a single file using the Load into Stack script. Now, in order to turn them into a GIF which shows each frame for however long you want, you need to bring up the Animation windows from the Window menu at the top:


Then click the little square in the top right corner of that window to bring up a menu of things you can do - one which is "Make Frames from Layers". This will instantly add each of your steps as a frame in the animation window. If they appear in the wrong order, just click "Reverse Frames" in the same menu!

Now you can set how long you want each frame to be visible. I tend to use somewhere between 0,5 to 1 second for each frame except the last, which I usually keep up for 3-4 seconds. You can hit the play button on the Animation window to give it a test run and see what works for you.

Once you're done, you can just save the whole thing as a GIF, and you're done!

-----------------

That's it, guys!! If you have any other (or better?!) Photoshop tips & tricks, feel free to tell me about them! I'm astonished by how much I can still learn about this program despite having used it for years, and I don't intent to stop learning now :)
My adventures with portrait making continues! Honestly, every time I make a new portrait, there's something new I learn or a new problem that appears, it's such a roller coaster. I hope by the end of this project, my skill and consistency will have improved enough that I'll be able to go back and fix or edit the portraits to a decent enough level!

Progress
Some portraits just work out better than others, and some I almost dislike too much to post at all. But I know I can't keep reworking and editing each portrait forever, so the best thing to do is to continue ahead and look back later, when you have more experience.

With that said, this isn't one of my least favorites, though I believe his shoulders look a bit weird (and who knows whether it's apparent it's a guy or not)! ;)

Once again I tried to focus on the Asian theme. Kind of embracing it now before I run out of Tai Ming characters! Unless we come up with more there's 11 left - but at least three of them are visitors from the Flying Fortress, so they will be designed quite differently!


Okay, that's it for this guy, onwards to more portrait practice!! See you later :D


Time for the last outdoor transformation post for a little while! I'm moving back to doing interiors until we've finished designing a certain boss fight...

But more on that later - first, let's take a look at the top left part of the map:


This part of the map features what we currently call the "government building", and a small graveyard. As always, my first step is to fix the ground color - this was actually automatically done when I changed colors on the previous parts of this island, as they're all part of the same layer. So, changing the color on one part of the island changes it everywhere on the island :)


Next, the building itself. As with the lab from yesterday, I don't know exactly what the inside will look like, as I haven't created it yet. So chances are I'll go back and change things around with the exterior once I know what's gonna take place indoors. For now though, some general cracks & dulled down colors.


As for the graveyard, there needs to be more graves added (time has passed, and life is short, a fact that's also true for most people in Grindea), and they also need to become more worn. The statue watching over them should show some signs of wear as well: moss and a couple more cracks.


Finally, I add more trees and bamboo with the editor, as well as a few details here and there - for instance, closing off the cave, which will only be accessible in the past after you find the correct key :)


***


Now, as I mentioned in the beginning of the post, I'll pause the demolition of the outdoors for now, until we've prototyped a boss fight. Since the only area I haven't been working on yet is the HQ, I'm sure you might be able to guess that there will be a boss fight taking place in the courtyard of the HQ! 

The reason I don't want to transform the area is because we're not sure if it's big enough yet -it's kind of important that you can move freely during boss fights, especially if you're doing multiplayer with 4 people. Chances are I'll have to remake part of the HQ courtyard if we realize the area we picked isn't big enough, so instead I'll focus on other things until we've tried the boss fight out in a placeholder courtyard.

Anyway! As always, here's a GIF showing the entire work in progress, as well as many of the tiny steps (I'll begin recording videos again once I need to create more items from scratch - I haven't really been making a lot of new props during these past-to-present transformations so far):

Okay, returning to the outdoors! This time I'm gonna demolish the area around the ape lab, which looked like this in the past:


For the present, it's pretty much the same as with the previous outdoors: darken the colors, add cracks and more plants. Beginning with the ground:


Next up, the surrounding props! The bridge has fallen to disrepair, with only a few planks left. No way of crossing there, in other words. For the Monkey sign, I fade the colors, turning the bright red into a more wood-like color, as time has worn the paint and brightness away. Same with the market stands, which now are empty:


For the house, I darken the colors and add a bunch of cracks. I still haven't decided what to do with the chimneys: perhaps I'll break some of them altogether? Since I'm not sure what the insides will look like yet, I'll probably have to go back to this house later and add or change things that will work well with the interior - perhaps breaking a window or two:


Finally, I add more props with our editor (again, this is not exactly how it'll look in the end, as the game engine will transform some of these items into their proper Present versions), and fix the pathway which has become partly overgrown: 


And here's a GIF of the entire thing, plus many of the smaller steps: 


Time for another portrait! This time I was trying to channel the Asian theme of Tai Ming, which I should be doing with more NPCs in the future. 

Still a bunch to do, after all... :)

GIF

Step-By-Step

Finished Sprite

There's still a lot of planning to be made for the next two Tai Ming zones, which means we need to have a lot of meetings! As always, we combine meetings and food, and this time we went to a new place - Mel's Diner, which serve what could be Gotland's most delicious hamburgers!


On the agenda this time was the locked cave I've mentioned in an earlier post, whjich will play an important role in the second zone. Previously, we just had a vague idea about it being a place to fight and solve a puzzle or two on your way to complete a quest leading you to the next part of the dungeon, but with this meeting, it's all fleshed out!

Basically, the cave has turned into a series of puzzle challenges of various types. Some involve time travelling, others don't - but the idea is that "hidden" inside the cave is a WIP 'Puzzle World', a place where the people of Tai Ming were supposed to be able to go to challenge themselves with some puzzles (after paying a hefty entry fee). 

Putting this area next to the graveyard might not have been the best marketing decision, of course.. Not the best place for something resembling a puzzle-themed amusement park! 


There will be five different rooms, plus an entry room where you'll be introduced to the theme park WIP and its owner!

Room #1: Ancient Statue (enemy) Puzzle
Here you'll have to use the statue enemies in a creative way to solve a puzzle with several buttons!

Room #2: A Key + Monkeys
Here you need a key to get to the next room. Only problem is, there are a bunch of monkeys also wanting the key, and they won't let you have it! You'll have to kill the right monkey before he throws the key to one of his friends.

Room #3: Path Puzzle
In this puzzle there will be statues (or other things), which you can move around in the past, that will fall in different direction in the present. With this knowledge, you have to push the right statue to the right place in order to fill a series of holes in your path to the next room!

Room #4: Combat Room
The puzzle here has long since stopped working, and instead you'll have to battle a series of enemies.

Room #5: Phase Shifting
A puzzle room originally sponsored by the crew at the Flying Fortress, now it's an advanced phase shifting puzzle where you have to shift through time!

As always, typically of Pixel Ferrets, we've probably overdone this a bit - turning our vague encounter & 1-2 puzzle cave into a ancient half completed theme park-ish thing! However, there aren't that many rooms, and the mechanics will hopefully be kind of straight forward (here's to hoping)! :)
Are you ready for some super early Monkey previews? Good, cause here they are:


So as always, this is a very early prototype. For instance, we feel like the throw is a bit too high, so it won't be that extreme once these guys are implemented for real! It also shouldn't turn into a brawler bot as it attacks you... ;)

Anyway, so the monkey has two attacks: it can hit you or it can throw another enemy at you. 


Each enemy it throws will have have a different kind of impact as it lands: the statue sends shockwaves in 4 directions, the plant releases a ton of seeds, and the thorn-worms will simply do a ton of damage. 

Oh yeah, right now the thorn worm don't have the proper sprite for when they're carried, so they kind of look like silly Digletts getting carried around, but in the future they will be rolled up!

You might wonder why we didn't implement this enemy before releasing the first zone, but the answer is simple: it doesn't appear until you've completed a (mandatory) quest in the second zone :)

Hope you look forward to it mixing things up!
Just a quick note - as you might notice, the usual URL for this blog now points to www.vilyaroo.com instead! Slightly better than blogspot.com/se/de etc, right? 

I'm also in the process of updating the design of the blog, so expect a revamp of sorts sometime in the near future. Going for a clean, black & white design that I really like so far - but I still have some things I need to fix before it's ready!

In the meanwhile, here's a pic of cutie Link sleeping until tomorrow's post:

His fur still hasn't grown out since his trials at the animal hospital,
perhaps since it's been so hot here this summer!

Continuing where we left off yesterday, it's time to move to the Inn Island, and work on demolishing things there! As usual, here's a reminder of what the place looked like before I started *ahem* ruining things: 

Like yesterday, we begin with changing the ground color to a darker, duller shade:


...and making sure the grass grows over the path here and there, losing the stones to time:


Next up, recoloring props! Here I've worked on the walls (which basically just got a color change and some cracks & holes borrowed from the walls from yesterday), the bridge, the sign and the barrels:


Then it's time to ruin the house, adding plenty of cracks to the walls to make up for the lack of cracks yesterday:


As for the other house, I decide to make it in the same style as Sizou's house in the first zone, completely bare:


...and since you have no business going into this house, there's a bunch of rubble barring the way:


I'm actually not super excited with the way this building looks (too much darkness on the inside), so I might return to this and actually add remnants of the interior, or ruin the wall closest to us, or add some trash or vines working as part of a roof, or something! We'll see!

Anyway, here's the last part, adding new present-only props and moving some things around with the editor:


And of course, the mandatory step-by-step GIF! :) 


Next PostNewer Posts Previous PostOlder Posts Home